How to Open the Battery Compartment on the LED Lights Remote
Opening the battery compartment on an LED lights remote can sometimes stump even the best of us. It seems like it should be straightforward, but now and then, it turns out to be a bit of a puzzle, especially if you’re not familiar with the design or if it’s your first time handling one of these remotes.
We’re here to clear up the confusion and make this task as easy as pie. Our guide will lay out simple steps and tell you about how to open the battery compartment on the LED lights remote.
Whether you’re not all that into tech or you just haven’t come across this type of remote before, we’ve got your back. We want to make sure this information is clear, straightforward, and helpful for everyone. Let’s dive into how to open the battery compartment on an LED light remote without any fuss.
Why You Need to Open the Battery Compartment on an LED Lights Remote
Understanding how to open the battery compartment on an LED light remote is vital for several key reasons. Primarily, this compartment is crucial for the remote’s power source. Without the ability to access and replace batteries, a dead remote remains non-functional.
Starting a new remote also necessitates this step. Beyond just replacing batteries, knowing how to open this compartment is fundamental for maintaining the remote’s longevity. Regular checks of the batteries can prevent damage from leaks, preserving the remote’s condition.
This knowledge also enables you to tackle common problems such as weak signals or buttons that don’t respond, which are often linked to battery issues. Furthermore, being familiar with this process can save time and frustration, especially when you need to quickly fix your remote.
It’s about gaining confidence in handling an everyday gadget and ensuring its optimal performance through simple, yet important, maintenance steps.
Tools We Need to Open Battery Compartment on LED Lights Remote
To open the battery compartment on an LED lights remote, you’ll generally need the following simple tools:
- Small, Flat-head Screwdriver: This is essential for gently prying open the compartment. Ensure the screwdriver is appropriately sized to avoid any damage to the remote. If a screwdriver isn’t available, a similar flat, thin tool like a butter knife or a coin can be a good substitute.
- Tweezers or Needle-nose Pliers: These tools are useful for carefully removing batteries that are tightly fitted or stuck in the compartment. They provide precision and ease in handling small or difficult-to-grasp batteries.
With these straightforward tools, opening the battery compartment becomes an easy and damage-free task, accessible even to those with minimal technical experience.
How to Open the Battery Compartment on the LED Lights Remote
Opening the battery compartment on an LED lights remote is a simple task, but the approach may vary slightly depending on the brand and model of the remote. Here’s a step-by-step guide to help you through the process:
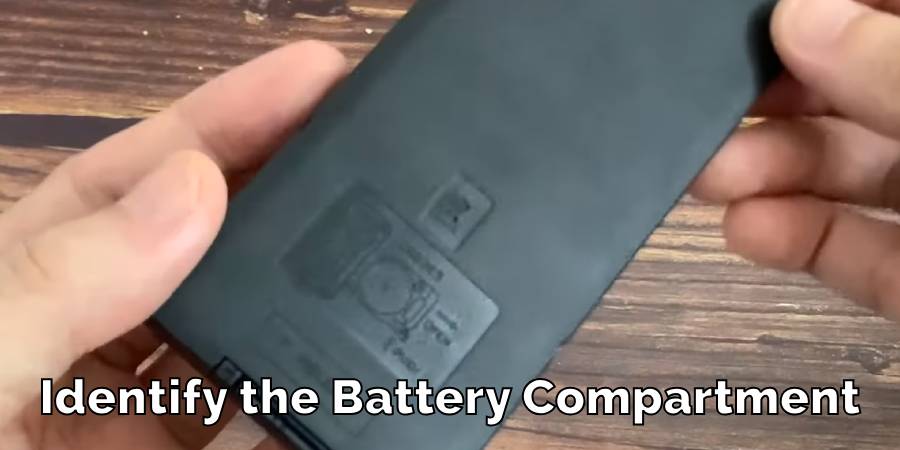
Identify the Battery Compartment
The first step is to locate the battery compartment. Typically, it’s on the back of the remote. Look for a small outline, indent, or tab that marks its location. This is usually designed to be noticeable and accessible.
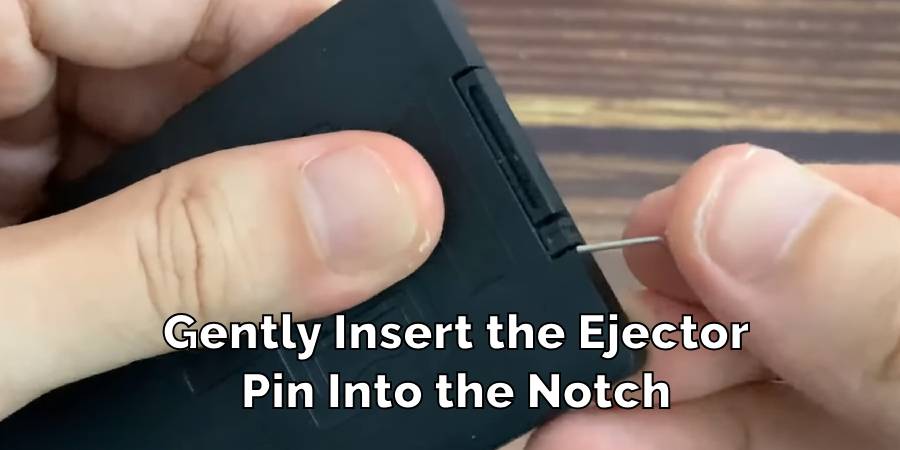
Pry Open the Compartment
Once you’ve located the compartment, you’ll need to open it. This is where your small, flat-head screwdriver or ejector pin comes in handy. Gently insert the screwdriver or ejector pin into the notch or under the edge of the compartment cover and carefully pry it open. If you don’t have a screwdriver, a similar thin and flat object can work as a makeshift tool.
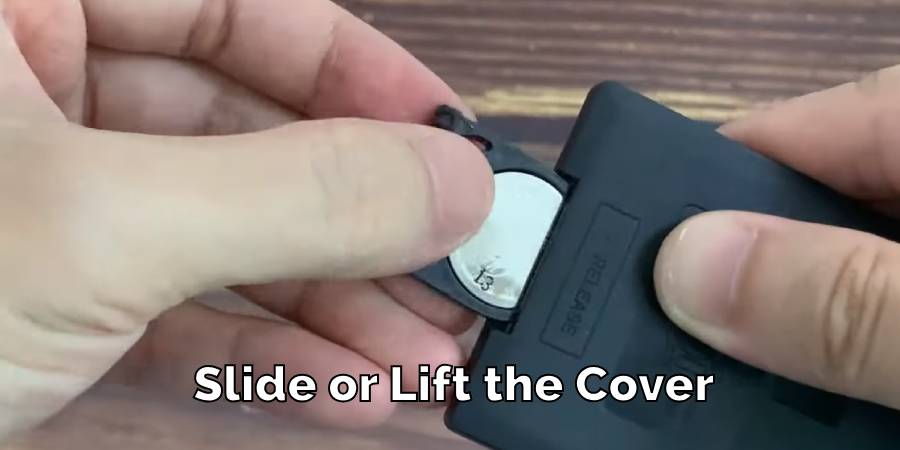
Slide or Lift the Cover
The compartment cover might either slide off or need to be lifted. This depends on the remote’s design. Perform this action gently to avoid breaking any small tabs or latches that might be securing the cover in place.
Accessing Difficult Compartments
In some cases, the compartment might not open easily. If you encounter resistance, check for any hidden screws, clips, or locks that might be holding the compartment shut. Sometimes, applying a bit of gentle pressure while sliding or lifting the cover can do the trick.
Handling Batteries
Once you’ve successfully opened the compartment, you might find that the batteries are snug or difficult to remove. This is where your tweezers or needle-nose pliers become useful. Use them to carefully extract the batteries. Be sure to take note of the batteries’ polarity (the positive and negative ends) when removing and replacing them, as inserting them incorrectly can prevent the remote from working.
Battery Replacement
When inserting new batteries, align them according to the polarity symbols inside the compartment. These symbols show the correct orientation for the positive (+) and negative (-) ends of the batteries.
Closing the Compartment
After replacing the batteries, align the cover back into its original position. Gently press or slide the cover until it clicks into place, indicating that it is securely closed.
Final Check
Once the compartment is closed, test the remote to ensure it’s working. If the remote does not work, double-check the batteries’ orientation and ensure they are fresh.
By following these steps, you can open the battery compartment of your LED lights remote with ease. Remember, the key is to be gentle and patient to avoid damaging your remote. This guide is designed to be simple and easy to follow, ensuring that anyone can perform this task successfully.
Precaution While Opening the Battery Compartment on the LED Lights Remote
When opening the battery compartment on your LED lights remote, it’s crucial to take certain precautions to ensure both your safety and the longevity of the remote:
- Use the Right Tool Size: Select a tool that fits well. A too-large screwdriver or prying tool can damage the delicate edges of the battery compartment. A correctly sized tool will fit snugly and allow for gentle prying.
- Avoid Excessive Force: Applying too much force can lead to breakage, not only of the battery compartment cover but potentially the remote itself. Gently pry and slide the cover off. If it doesn’t open easily, double-check for any screws or locks you might have missed.
- Be Mindful of Battery Polarity and Type: Incorrectly inserting batteries can damage the remote. Always match the positive (+) and negative (-) ends of the batteries with the corresponding symbols in the battery compartment. Also, use the correct battery type as specified in the remote’s manual.
- Check for Battery Leakage: Before inserting new batteries, inspect the compartment for any signs of old battery leakage, such as corrosion or residue. If you find any, carefully clean it out with a dry cloth or a cotton swab. Avoid touching leaked battery substances, as they can be harmful.
- Handle Batteries Properly: Don’t mix old and new batteries or different types of batteries. This can lead to poor performance or even damage to the remote.
- Close the Compartment Securely: After replacing the batteries, make sure the compartment cover is securely fastened back in place. This prevents the cover from coming loose and the batteries from falling out.
- Regular Maintenance Checks: Periodically check the batteries for their life and condition. This proactive approach helps in maintaining the effectiveness of your remote and prevents unexpected power loss.
By following these simple yet essential precautions, you ensure a hassle-free experience while dealing with the battery compartment of your LED lights remote. Remember, careful handling and attention to detail are key to maintaining the functionality and longevity of your gadgets.
FAQ’s
How Do You Put Batteries in an LED Light Remote?
First, locate the polarity markers (the plus (+) and minus (-) symbols) inside the battery compartment. These symbols indicate how to insert the batteries.
Match the positive end of the battery (usually marked with a “+”) with the positive symbol in the compartment, and the same with the negative end. Inserting batteries the wrong way can prevent the remote from working.
How Do You Open a Remote Control Battery Cover?
Opening the battery cover typically involves sliding or prying it open. Look for a notch or an edge where you can insert a flat-head screwdriver or a similar tool.
Some remotes might have a small screw that needs to be unscrewed first. If the cover slides, apply gentle pressure in the direction indicated by arrows, if present.
Is My LED Light Remote Battery Dead?
If your remote stops responding, the battery may be dead. The simplest way to check is by replacing the current battery with a new one. If the remote works with the new battery, the old one is indeed dead. If not, there might be other issues with the remote.
How Do You Open a Battery Cap?
For remotes with a cap-style battery compartment, you typically need to twist the cap to open it. Hold the remote firmly and turn the cap slowly in the direction indicated (usually counter-clockwise). Ensure you don’t apply too much force to avoid breaking the cap.
How Do You Remove a Stuck Battery Cover?
If the battery cover is stuck, apply gentle, even pressure and try to wiggle it slowly. If it doesn’t budge, inspect for any hidden screws, latches, or clips that might be holding it in place. Sometimes, using a thin tool like a credit card to slide along the edges can help loosen the cover.
Conclusion
Gaining the know-how to open the battery compartment on your LED lights remote is a small but important skill. This ability is crucial for maintaining the functionality and extending the life of your remote by ensuring proper battery care.
Gentle handling and using the correct tools are key to accomplishing this task without causing damage. With the straightforward steps outlined in this article, you can confidently manage this task on your own.
This skill empowers you to keep your remote in top working condition, ensuring its reliability and effectiveness whenever you need it. This article has explored how to open the battery compartment on the LED lights remote.
How to Change a Light Switch without Turning Off the Power
Mastering the skill of changing a light switch without turning off the power holds great…
How To Stick LED Strip Lights On Wall Without Damaging Paint
LED light strips have surged in popularity, adorning homes and spaces with their vibrant colors…
Can Led Lights Get Wet
LED lights are everywhere, from homes to city streets, known for their efficiency and brightness….

Creative Ways to Use LED Strip Lights in Your Home
LED strip lights, those brilliant strips of technology, serve as a beacon of innovation in…

Can Solar Lights Catch Fire
Solar garden lights are your go-to pal for lighting up your backyard oasis while keeping…
What gauge wire for LED lights
When diving into LED lighting, one aspect that might not catch your eye at first…