How to Hook up LED Lights to the Fuse Box
Hooking up LED lights to a fuse box is a fantastic way to brighten up your car, home, or office. It might seem a bit daunting at first, but with the right guidance, it’s completely doable.
LED lights are not only more luminous but also much more efficient than traditional bulbs, making them a superior choice for lighting. By connecting them to a fuse box, you ensure they have a reliable power source, minimizing the risk of electrical problems such as overloading.

In this guide, we’ll take you through every step of the process, from selecting the appropriate tools to completing the installation. By following these instructions, you’ll be able to safely and effectively enhance your space with LED lighting. Let’s dive into how to hook up LED lights to the fuse box, ensuring your setup is both efficient and safe.
Why You Should Hook up LED Lights to Fuse Box
Connecting LED lights to a fuse box is a wise choice for several reasons. First, LED lights have many benefits over traditional bulbs. They last much longer, which means you won’t have to replace them as often.
They also use less electricity, so they can save you money on your energy bills. Plus, they provide brighter light, making them ideal for spaces where good visibility is important. When you hook them up to a fuse box, you ensure they get a consistent power supply.
This is important for maintaining the brightness and efficiency of the LEDs over time. Additionally, a fuse box connection helps keep the electrical system safe.
It does this by preventing too much current from passing through the circuit, which can cause damage or even fires.
By connecting your LED lights this way, you create a setup that’s not only effective but also organized and safe. This means your LED lights will work well and last longer, giving you peace of mind and better lighting.
Tools We Need to Hook up LED Lights to Fuse Box
Before starting the installation of LED lights to a fuse box, it’s essential to gather the right tools. Having these tools on hand will make the installation process smoother and safer. Here’s what you’ll need:
- Wire Strippers: These are crucial for safely exposing the wires without damaging them.
- Screwdrivers: Needed for opening the fuse box and securing connections.
- Electrical Tape: This tape is used to insulate and protect wire connections.
- LED Light Kit: The main component, is the LED lights you’ll be installing.
- Connectors: These help in making secure connections between wires.
- Fuse Tap Connectors: Essential for connecting your lights to the fuse box.
- Multimeter (optional): Useful for checking electrical connections and voltages.
Remember, each tool has its specific purpose in the installation process. The wire strippers and connectors ensure your wires are prepared correctly. The screwdrivers and electrical tape are for securing and protecting your connections.
The LED light kit is your primary installation component, and the fuse tap connectors link your lights to the fuse box. The multimeter, though optional, can be a handy tool for troubleshooting. By having all these tools ready, you’ll be well-prepared to successfully hook up your LED lights to the fuse box.
How to Hook up LED Lights to the Fuse Box (12 Steps)
Before you start, it’s important to know each step in the process of installing LED lights in your fuse box. These steps are designed to guide you safely and effectively, ensuring that your LED lights work well and look great. Here’s what you need to do:
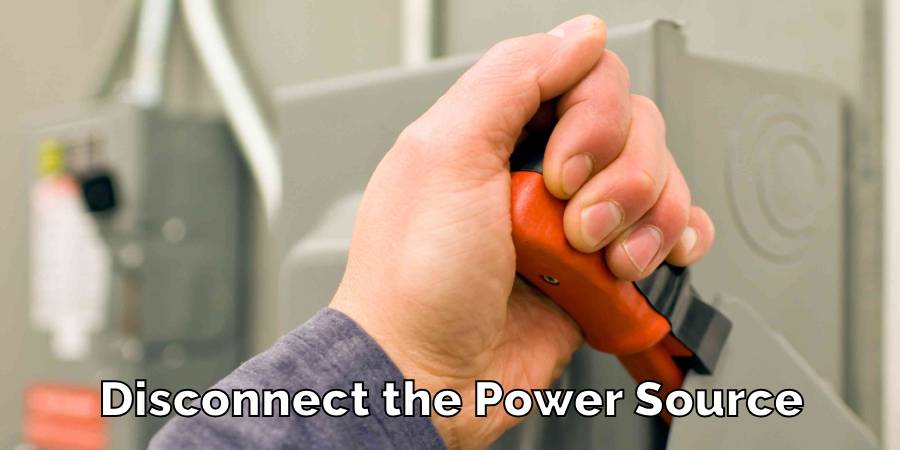
Safety First
Before beginning any work, it’s crucial to disconnect the power source. This is the most important step to prevent electric shock and ensure a safe working environment. Whether you’re working in a vehicle or at home, finding and turning off the main power source is a must.
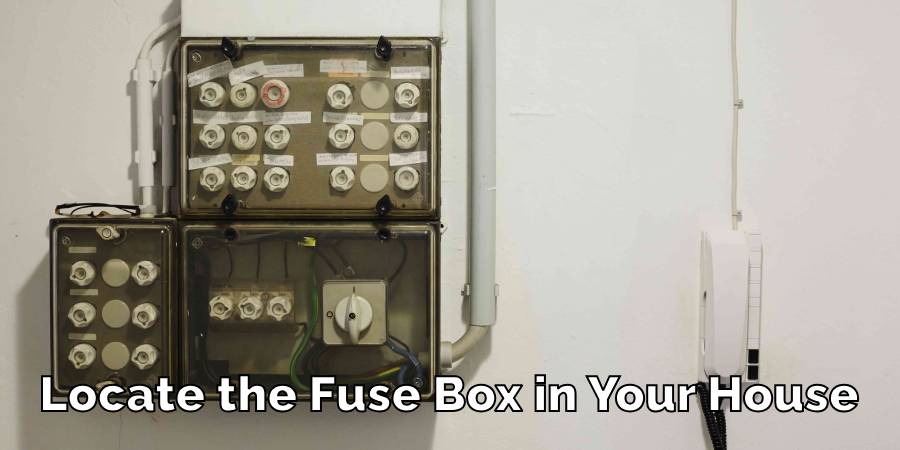
Identify the Fuse Box
The next step is to locate the fuse box in your vehicle or house. Fuse boxes are usually found in easily accessible places like under the dashboard in cars or in utility rooms in homes. Make sure you can easily reach it and have enough light to see what you’re doing.
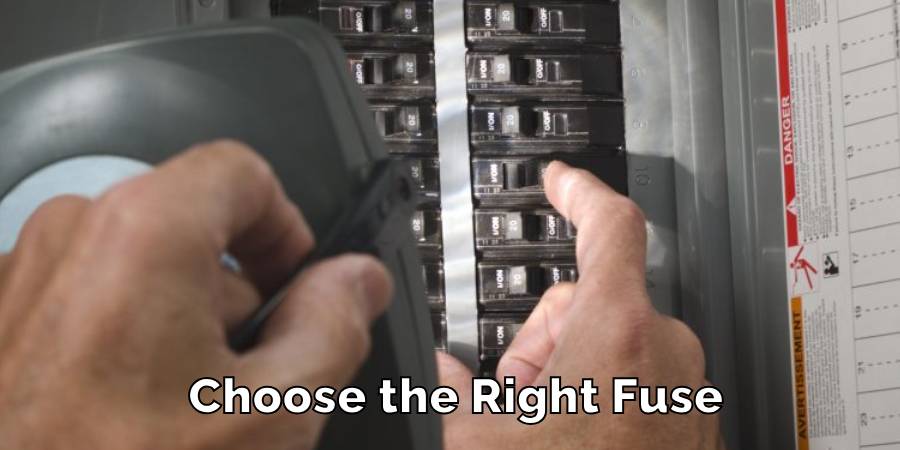
Choose the Right Fuse
Look at your fuse box and pick a fuse that is switched on with your ignition or power source, like the radio or accessory fuse. This ensures your LED lights only operate when the vehicle or device is on, preventing battery drain.
Prepare the LED Lights
Open your LED light kit and lay out all the parts. Make sure everything that should be in the kit is there and in good condition. This includes the LED strips or bulbs, wiring, and any mounting hardware. Having everything prepared and organized will make the installation process smoother.
Install the Fuse Tap Adapter
A fuse tap adapter allows you to connect new electronics directly to your fuse box without cutting into the factory wiring. Remove the chosen fuse from the fuse box and insert it into the fuse tap. Then, insert the fuse tap back into the fuse slot from where you removed the original fuse.
Connect the LED Lights
Strip the end of the wires coming from your LED lights. Connect the positive wire to the fuse tap’s lead wire. Use a wire crimper to secure the connection. Then, find a good grounding point for the negative wire—a metal part of the vehicle’s frame or body is ideal. Secure the ground wire with a screw or bolt to ensure a good connection.
Secure the Wiring
Run the wiring from your LED lights to the fuse box and ground point. Use zip ties or electrical tape to secure the wires out of the way of moving parts or heat sources.
Test Your Lights
Once everything is connected, turn on your power source or ignition to test the LED lights. If they don’t turn on, check your connections, especially at the fuse tap and ground.
Tidy Up
With your LED lights working, tidy up any loose wiring and ensure all connections are insulated with electrical tape to prevent short circuits.
Remember, safety first. Always disconnect the power source when working on electrical projects to avoid shock or damage. If you’re unsure or uncomfortable with electrical work, it’s best to consult a professional. Hooking up LED lights to your fuse box is straightforward if you follow these steps carefully, providing a reliable and efficient lighting solution.
Precaution while Hooking up LED lights to the Fuse Box
- Disconnect Power Before Starting: Always turn off the power source before you begin. This is the most important step to prevent any chance of an electric shock.
- Secure All Connections: Make sure every wire connection you make is tight and secure. Loose connections can lead to dangerous short circuits.
- Avoid Circuit Overloading: Be mindful of the total power load you’re adding to the fuse box. Connecting too many lights or devices can overload the circuit, potentially causing a fuse to blow or, worse, an electrical fire.
- Use the Right Fuse: Select a fuse that matches the power requirements of your LED lights. Using a fuse that’s too weak can cause it to blow frequently, while a too-strong fuse might not protect effectively.
- Check Wire Conditions: Inspect all wires for any damage like cuts or frays. Damaged wires can be hazardous and should be replaced or repaired.
- Ground Properly: Ensure the ground wire is attached to a proper grounding point. This is crucial for safety, especially in preventing electrical shocks.
- Test Before Final Setup: After connecting everything, but before the final installation, do a test run by briefly turning on the power. This helps to check if everything works correctly and safely.
- Keep Water Away: Ensure your LED lights and connections are away from water or any moisture. Water and electricity are a dangerous combination.
- Don’t Work Alone: If possible, have someone with you when working on electrical installations. It’s safer in case of an unexpected situation.
- Consult a Professional if Unsure: If you’re ever unsure about any part of the installation, it’s wise to consult with a professional electrician. Safety should always be your top priority.
FAQ’s
What Fuse to Use for LED Lights?
Choosing the right fuse for LED lights is crucial. The fuse’s current rating should match the LED lights’ power requirements. If the fuse’s rating is too high, it may not protect your lights properly.
On the other hand, a fuse with a too-low rating will frequently blow out, causing inconvenience and potential safety issues. Check your LED lights’ specifications for the recommended fuse rating to ensure safe and effective operation.
How Do You Connect LED Lights to Wires?
To connect LED lights to wires, first use wire strippers to remove a small portion of insulation from the ends of the wires. This exposes the conductive material needed for a connection. Then, twist these stripped ends onto the terminals of the LED lights.
To secure this connection, you can use connectors or soldering, depending on your preference and the requirements of your lighting setup. Ensure the connections are tight and well-insulated to prevent short circuits.
Do 12v LED Lights Need a Fuse?
Yes, using a fuse with 12v LED lights is essential for safety. A fuse in the circuit helps protect against electrical overloads and potential hazards such as electrical fires or damage to the lights.
It acts as a safety barrier by interrupting the power flow if the current becomes too high. This is especially important for LED lights, which can be sensitive to overcurrent.
How Do LED Fuses Work?
LED fuses are designed to safeguard the lighting system. When the electrical current flowing through the fuse exceeds a specific limit (the fuse’s rating), the fuse will ‘blow’ or break the circuit.
This interruption in the power flow protects the LED lights from potential damage caused by excessive current. It’s a simple yet effective way to prevent electrical issues, ensuring the longevity and safety of your LED lighting setup.
Conclusion
Installing LED lights to a fuse box is a great way to enhance the lighting in your space, bringing in not just more light, but also more efficiency and safety. By carefully following the outlined steps, you can achieve a successful installation that brightens up your area effectively.
It’s important to always prioritize safety in this process. If at any point you feel unsure or out of your depth, seeking advice or assistance from a professional electrician is a wise decision.
Remember, having the right tools at hand and taking your time during the installation are key factors to a smooth and successful setup. Patience and attention to detail will go a long way in ensuring that your LED lights are installed correctly and safely.
In the end, you’ll be rewarded with a well-lit and inviting space, thanks to the efficient and reliable lighting provided by your newly installed LED lights. this article has explored how to hook up LED lights to the fuse box.

How to Change a Light Switch without Turning Off the Power
Mastering the skill of changing a light switch without turning off the power holds great…

How To Stick LED Strip Lights On Wall Without Damaging Paint
LED light strips have surged in popularity, adorning homes and spaces with their vibrant colors…

Can Led Lights Get Wet
LED lights are everywhere, from homes to city streets, known for their efficiency and brightness….

Creative Ways to Use LED Strip Lights in Your Home
LED strip lights, those brilliant strips of technology, serve as a beacon of innovation in…

Can Solar Lights Catch Fire
Solar garden lights are your go-to pal for lighting up your backyard oasis while keeping…
What gauge wire for LED lights
When diving into LED lighting, one aspect that might not catch your eye at first…